July 29, 2010

Baked Tomatoes with Parmesan & Herbs {Webisode #34}


What’s Going on Today: Trip to The Garbage Museum (no joke, watch the video).
Naptime Goals: Prepare Baked Tomatoes with Parmesan & Herbs, Cookie Crumble Parfaits.
Tonight’s Menu: Tagliatelle, Baked Tomatoes, Cookie Crumble Parfaits, Wine (for the parents)
Parenting Lesson of the Day: Never underestimate the appeal of garbage!

It’s hard to believe that we spent an entire morning at The Garbage Museum, but we did. I have to say, it was quite an educational outing that all the parents, unexpectedly, enjoyed! When we came home from our inspiring outing my daughter crashed for a long afternoon nap. While she rested I used the time to prepare dinner with some of the great tomatoes I’d recently brought home from the farmer’s market.

I love cooking with tomatoes and can’t get enough of them in the summer when they are so readily available. It’s not unusual that I roast tomatoes. If you remember, last summer I wrote about how I love to slow-roast them during naptime and eat them all afternoon. This summer I decided to write about another favorite recipe, baked tomatoes. Here you’ll see that I drizzle them with a generous coating of olive oil, stuff them with a mixture of Parmesan and herbs and keep them in the fridge until I roast them for dinner. Easy and delicious, they are a great way to celebrate summer flavor.

Recipe

Baked Tomatoes with Parmesan & Herbs

Ingredients

 5 large tomatoes
1 c. olive oil
½ c. freshly grated Parmesan Cheese
½ c. bread crumbs (plain or Panko)
¼ c. freshly chopped Parsley

Instructions

1. Preheat oven to 350ºF. Cut the tomatoes in half and scoop of the seeds with a spoon. Nestle each half, cut side up, in a baking dish.
2. Drizzle the tomatoes with the olive oil and pat around them to make sure they are nicely coated.
3. Mix the breadcrumbs, cheese and parsley together in a bowl. Pat even amounts into each tomato. Bake for 25-30 minutes until the tops are golden brown and the cheese is slightly melted.

Naptime Notes

Naptime Recipe Serving ideas

Other herbs like thyme, rosemary or basil would be delicious in this. It would also be great if you wanted to mix the herbs make flavors all your own.

Naptime Stopwatch

Preparing the tomatoes takes about 20 minutes. Baking time is an additional 25 minutes.

Naptime Reviews

My daughter would only eat hers after I’d cut it up and tossed it with pasta. But my husband and I devoured them just as they were!

More Naptime Recipes

July 27, 2010

Homemade Snickers Bars for a Bridal Shower {Naptime Simple Tips}

What’s Going on Today: Morning at the beach, afternoon hosting friend’s bridal shower with Mom.
Naptime Goals: Set out napkins, dessert plates and centerpiece.
Today’s Menu: Lemon Cake, Fruit Salad, Meringues, Homemade Snickers Bars, Champagne.
Parenting Lesson of the Day: When hosting parties keep the kids far, far away from the house.

There was a period in my 20’s when I attended a bridal shower or wedding every other week. That era seems to be over now that most of my friends are, in fact, married. Instead, those bridal showers have been swapped for baby showers, baptisms and the like. I have to say, I kind of miss the exciting parties that surrounded all of our weddings. It was such an fun time, the start of a new chapter, picking out flowers and china. Last weekend I was thrilled to relive that excitement when my Mom and I hosted my friend’s younger sister’s bridal shower. It was a chance to dust off our champagne flutes, do up the house with ribbons and host some present-opening fun.

As a centerpiece for our afternoon dessert buffet my Mom ordered a professional cake in the shape of the bride’s house. It was lemon flavored, layered with thin swipes of jam and whipped cream. It was decadent to boot and it was up to me to figure out how to supplement the citrus sponge with a few more sweet nibbles. Since I love just about any recipe by Dorie Greenspan and, of course, we needed something chocolate, I decided to try out her recipe for Snickety Squares. They are the perfect make-ahead sweet and can easily be cut into bite size pieces.

I did a lot of preparation for the shower the day before. While my daughter napped I made the squares, baking the shortbread, layering the dulche de leche and chocolate, topping it all with caramelized peanuts. Then I set about folding the napkins, pulling platters out of the closet and doing some general clean-up in anticipation of guests the next day.

The squares chilled in the fridge overnight and I cut them into bite size pieces right before the shower. Not only did they prove easy to make, they looked great on the table and were the perfect foil for the rest of the buffet which was full of fruit flavors. The entire event came together beautifully though, truth be told, we were all paying more attention to our friend, the bride-to-be, then the food.

Recipe

Homemade Snickers Bars

adapted from Dorie Greenpan’s Baking From My Home to Yours

Ingredients

Crust:

1 c. all-purpose flour
¼ c. sugar
2 T. confectioners’ sugar
¼ t. salt
1 stick (8T.) unsalted butter, cut into small pieces and chilled
1 large egg yolk, lightly beaten

For the filling:

1/3 c. sugar
3 T. water
1 ½ c. salted peanuts
1 16oz. jar store-bough dulce de leche

Topping:

7 oz. bittersweet chocolate, coarsley chopped
½ stick (4 T.) unsalted butter, cut into 8 pieces

Instructions

1. Preheat oven to 350ºF. Butter an 8″ square pan and set aside.
2. Pulse the flour, sugar, confectioners’ sugar and salt in a food processor a few times. Then, add in the cold butter and pulse about a dozen times until the mixture looks like a coarse meal. Pour the yolk in, pulse just until a ball of dough forms. Press this ball into the bottom of the cake pan. Prick it all over with the tines of a fork and bake for 15-20 minutes or just until the edges begin to color.
3. To make the filling: line a baking sheet with parchment paper or silpat. In a medium saucepan put the sugar and water in the saucepan and cook it over medium heat until the sugar dissolves. Then, continue cooking, without stirring just until it starts to turn an amber brown. Toss in the peanuts and start stirring with a LONG handled spoon. The peanuts will get coated with sugar and turn white, then turn a nice amber caramel. Remove them from the pan when they are lightly browned, but not burned, and turn them onto the lined back sheet to cool.
4. When the crust is cool layer on the dulce de leche and sprinkler top of it with half of the carmelized peanuts.
5. Melt the chocolate and butter in the microwave, or in a heatproof bowl set over simmering water, until just smooth and combined. Pour this over the dulce de leche.
6. Chop the remaining peanuts finely and sprinkle them over the chocolate.
7. Cool the entire pan in the refrigerator for at least 3 hours if you’d like to serve them cold. They can stay, covered, in the fridge for a few days.

Naptime Notes

Naptime Recipe Serving ideas

Chill these well and cut them into bite size pieces right before serving them. If you want to get extra fancy you can serve them in mini-muffin holders.

Naptime Stopwatch

Making these takes about 30 minutes, not including time for cooling and chilling.

Naptime Reviews

My daughter actually found these a little too sweet but happily tried a few bites nonentheless.

July 22, 2010

Blueberry Pie Filling in a Jar {Webisode #33}

What’s Going on Today: Last day in Cooperstown, bike ride with daughter, blueberry picking with Dad!
Naptime Goals: Can 2 quarts of Blueberry Pie filling with my Dad.
Tonight’s Menu: Mom’s cooking (again!), I am in charge of the corn.
Parenting Lesson of the Day: Never let them wear treasured clothes when blueberry picking.

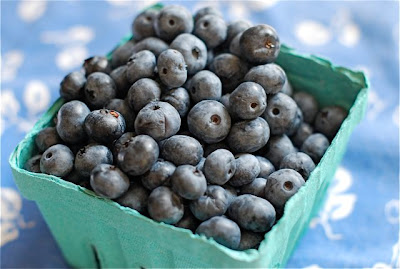
Last weekend in Cooperstown was so much fun that I’m still writing about it. Luckily, our visit coincided with the height of blueberry season. My Dad and I took my daughter blueberry picking one morning and came home with several pints. We also had a few more pints that we’d picked up at the farmer’s market so, come naptime, there was a lot to work with. As you saw earlier this week, I’d already made a cake and this time I wanted to do something different.

The unfortunate part about fruit pies in general is that they are typically seasonal due to the availability of the fruit. However, I have now found a way to get around this. Inspired by my friend Cathy, I made my usual blueberry pie filling recipe and canned it in quart jars for later. As you’ll see above, the process was incredibly simple and easily handled during naptime. Once the jars cooled we even took one right over to our friends house as a gift. I think I might have to dedicate a few more naptimes to canning fruit pie fillings. Not only will the larder be stocked with fresh, local berries for the whole winter, but I’ll have all of my Christmas presents completed by the end of July!

Recipe

Blueberry Pie Filling in a Jar

Ingredients

makes 2 quarts

10 c. blueberries, washed and dried
½ c. water
1 ½ c. sugar
6 T. cornstarch
5 T. bottled lemon juice

Instructions

1. Wash and dry the blueberries and set aside. Sterilize 2 quart jars along with the lids in boiling water or in a dishwasher run without soap.

2. In a large stockpot bring the water, sugar, corn starch and lemon juice and to a boil.

3. Pour in the blueberries very carefully and bring the mixture back to a boil, stirring continuously with a long spoon. Keep stirring for about 5 minutes while the berries release their juices and the mixture thickens, becoming blue and glossy.

4. Set a funnel over a quart jar and ladle in the blueberry mixture, leaving about 1″ of room at the top. Repeat with second quart jar.

5. Placed the sterilized lids on the jar and seal them with the rims, only tightening the ring as much as you can with your own hand. Do not force it.

6. Place the jars in a pot of boiling water standing on end. Make sure the water covers the tops of the jars. Boil for 30 minutes, starting the timing when the mixture has returned to a boil after the jars have been added.

7. Remove jars and place in a cool, dry place on a kitchen towel. Allow to cool naturally for a few hours. Store jars for the long term in a cool, dry place until using.

Naptime Notes

Naptime Recipe Serving ideas

I am still experimenting with other fruits, but canning pie filling is a smart and economical way to ensure the fresh fruit flavor of summer all year long.

Naptime Stopwatch

Making the filling takes about 10 minutes. Processing the cans in a waterbath takes about 30 minutes.

Naptime Reviews

A great gift, great filling and fun way to preserve summer in a jar – what’s not to love!

July 21, 2010

The Naptime Chef: THE BOOK

Yes, the rumors are true! The Naptime Chef: Fitting Great Food Into Family Life, my first cookbook, will be published by Running Press in Spring 2012. Just writing that sentence makes me want to jump out of my seat and do a little dance around the room! Or, at least, have another glass of champagne.

Selling a book is an awesome project. Awesome in the sense that it requires quite a bit of work, patience and time. It’s a bit of marathon really, from start to finish, and I definitely did not do it all by myself. This process would never even have started without my awesome agent Jenni. She saw the potential in the story from the start, coached me through the proposal and rallied me through the sale. Because of her I am looking forward to entire year of writing an fantastic cookbook filled to the brim with Naptime Chef recipes (some old, MOST new!) and I couldn’t be more grateful. I promise, I will write and cook my heart out to create a wonderful and true resource that will reside on your cookbook shelf for years to come. I also promise a few great book parties. And, a few more flutes of champagne.

So, my editor, Kristen, and I are off and running. I can’t wait to share more about the process of writing a cookbook the further I dive into this. Also, if anyone has suggestions for something they want to see in the book feel free to leave a comment and let me know. I’m all ears!

In the mean time, as if a new book weren’t enough, this lovely lady is redesigning my entire website that will be debuting in less than month. You can look forward easy navigation, great style and lots of printable recipe pages!

And, last but not least, I thank you, readers, for all of your support and enthusiasm. I look forward to giving you a true bound book that will prove exciting and invaluable. This is a day for all of us to celebrate. So, pour yourself a glass of bubbly and toast to the beginning of a new adventure!

July 20, 2010

Blueberry Thyme Poundcake with Lemon Glaze {Naptime Everyday}

What’s Going Today: Hanging out in Cooperstown preparing for my friend’s bridal shower, catching up with friends, trip to the farmer’s market.
Naptime Goals: Make Homemade Snickers Bars for the bridal shower (it’s a bit of an experiment, post to come next week), help Mom get out the china, silver, etc.
Tonight’s Menu: Mom’s making us all a quesadilla feast with fresh farmer’s market vegetables!
Parenting Lesson of the Day: Once they learn how to ride their bikes they never want to stop.

I have had a blueberry surplus in my house this month. This is one of those once-a-year problems I happily embrace. I’ve frozen a few bags full, preserved some in simple syrup and used the rest to make this cake, a Blueberry Thyme Poundcake with Lemon Glaze, that hits all the right notes with flavor and texture.

I whipped this up during naptime the day before my trip to Cooperstown. The batter came together easily and my kitchen smelled like lemon heaven for the remainder of the afternoon. Tempted though I was to dive right in with my fork, I decided to wait to share it with my parents before taking my first bite.

The following morning I placed the cooled cake in a round Tupperware, snapped on the lid and settled it into the front seat of the car for a trip to Cooperstown. When I arrived at my parent’s house the cake was nice and cool (thank you air-conditioning vent), perfectly moist and ready for consumption. I don’t usually do road tests with my food, but it is worth noting that this cake is a hearty traveler.

The citrusy herbal flavor paired beautifully with the blueberries, giving it an oddly refreshing quality not usually associated with dense cakes. My parents and I would’ve liked to have eaten the entire thing ourselves but, since we are being mindful of our waistlines in the midst of bathing suit season, we decided to take the opportunity to win over some neighbors. Half of the cake was wrapped up in aluminum foil and given to our friends Dotty and Hank, a quarter was served to our friends Geri and Cheryl and the remaining quarter we gobbled right up. Even my daughter liked it – she has become a recent blueberry fan – and was intrigued by it’s lemony flavor. In the end this cake was gone far too quickly but that’s fine with me. Now I have reason to head back to the blueberry bushes and pick more.

Recipe

Blueberry Thyme Poundcake with Lemon Glaze

adapted from Luscious Berry Desserts by Lori Longbotham

Ingredients

1 c. whole milk
2 T. fresh thyme, chopped
3 ½ c. sifted cake flour (NOT self-rising)
½ t. baking powder
¼ t. salt
3 sticks unsalted butter, room temperature
2 ¼ c. sugar
6 large eggs
4 t. finely grated lemon zest
1 t. vanilla extract
3 c. ripe blueberries, washed and dried
½ c. fresh lemon juice

Instructions

1. Preheat oven to 350ºF. Butter and flour a 10″ Bundt pan and set aside.
2. Over low heat bring milk and thyme to a boil. Remove from heat and cover the pot with a kitchen towel. Steep for 7 minutes, pour it through a fine mesh sieve and allow to cool to room temperature.
3. Whisk together flour, baking powder and salt in a small bowl and set aside.
4. Beat the butter with an electric mixer on medium-high speed until light and fluffy. Reduce the speed and pour in 1 ¾c. sugar until it is entirely incorporated. Beat in the eggs one at a time, beating well after each addition. Reduce the speed to low and add the flour mixture alternating with the milk in 3 batches, ending with the flour. Beat in 2 t. of the zest and vanilla. Stir in the berries with a spatula.
5. Bake for 1hr 30 minutes, or until cake begins to pull away from the sides of the pan and a wooden pick inserted in the center comes out clean. Let the cake cool in the pan on a wire rack for 20 minutes, then turn it onto the rack and set it right side up out of the pan.
6. In a saucepan bring the remaining ½ c. sugar, 2 t. zest and lemon juice to a boil over medium heat. Remove from heat and let stand for 5 minutes. Brush lemon mixture over the warm cake and let cool completely.

Naptime Notes

Naptime Recipe Serving ideas

This would be a fantastic cake for a summer picnic or potluck. It holds up well traveling and will stay fresh for a few days. It also freezes well when wrapped in plastic and aluminum foil.

Naptime Stopwatch

Making this batter takes a full 20 minutes. The baking time is lengthy – 1hr 30minutes, but entirely worth it.

Naptime Reviews

This was a crowd-pleaser all around. Kid love it too, especially if you let them have a little nibble for breakfast with a dollop of yogurt.

July 15, 2010

Summer Zucchini Bites {Webisode #32}

What’s Going on Today: Big pancake breakfast, morning trip to the beach (hence the wet hair in the video), sunday chores.
Naptime Goals: Make Zucchini Bites with the zucchini I recently picked up at the farmer’s market this week, finish up some Babble columns.
Tonight’s Menu: Grilled Soyaki Chicken Thighs, Zucchini bites, cous-cous, Chocolate Chip Butterscotch Blondies.
Parenting Lesson of the Day: Never engage your child in negotiations regarding candy before lunchtime.

If you’ve ever seen a woman at your farmer’s market hording zucchini from every available stand it’s probably me. My love for zucchini knows no bounds and I am not afraid to admit that I buy it by the ton this time of year. I have a whole roster of great zucchini recipes and this is one from my mother-in-law. I love to make these little bites for a healthy afternoon snack or to serve alongside dinner. Or both.

Summer Zucchini Bites | The Naptime Chef

As you’ll see in the webisode, making these merely requires a bowl, spoon and measuring cup. The rest is simply a matter of grating and mixing. I easily whipped these up during my daughter’s naptime so that we could all enjoy them for an afternoon snack. The best way to describe their taste is somewhere between a mini-quiche and a muffin. Savory and light, they are puffy and easy on the stomach since, after all, none of us want to be eating heavy foods in the middle of summer. Perhaps I shouldn’t admit this, but after we shot this video the three of us polished off the whole pan! Ah, summer.

Recipe

Summer Zucchini Bites

Ingredients

2 c. grated zucchini
2 eggs, lightly beaten
½ yellow onion, finely chopped
½ c. sharp cheddar, grated
½ c. bread crumbs
¼ c. fresh parsley, finely chopped

Makes approximately 24 mini-muffin sized bites

Instructions

1. Preheat the oven to 400ºF. Butter a mini-muffin tin, set aside.
2. In a large glass bowl add two eggs and beat lightly with a whisk. Then, add the zucchini, onion, cheddar, bread crumbs and parsley and combine them with a wooden spoon.
3. Using your hands or an ice-cream scoop, fill each muffin cup just to the top. Bake  for 15-18 minutes or until the top is browned and set.

Naptime Notes

Naptime Recipe Serving ideas

These would be great served as a light bite at a dinner party or on a buffet table. If you want to mix up the flavors try using shallots instead of onions.

Naptime Stopwatch

Making this batter takes less than 15 minutes. Baking times is 15-18 minutes.

Naptime Reviews

This is a fun healthy vegetable bite for toddler. Despite the fact that my daughter dislikes eggs she will take a few bites of these.

More Naptime Recipes

July 13, 2010

Everyday Chocolate Chip Coconut Oatmeal Cookies {Naptime Everyday}

Chocolate Chip Coconut Oatmeal Cookies | The Naptime Chef

What’s Going on Today: Fun morning at the playground and beach, easy picnic lunch outdoors.
Naptime Goals: Make Chocolate Chip Coconut Oatmeal Cookies just because, marinate chicken, laundry, vacuum sand out of the car (!)
Tonight’s Menu: Rosemary Lemon Chicken, Carrot Souffle, Arugula Salad.
Parenting Lesson of the Day: You can never have too many stain sticks.

Since I firmly believe that sweets should be homemade rather than store-bought, I always try and dedicate at least one naptime a week to baking simple treats that are perfect for munching on all week long.

I am hardly ever at a loss of baking inspiration given the number of cookbooks on my shelf and magazines I subscribe to. My most recent source of information has come from the awesome SoNo Baking Company & Cafe Cookbook. I think part of the reason I love it so much is that I practically live around the corner from the actual cafe and secretly aspire to recreate their wall of baked goods in my own home. But, since that would require hours, even days, of labor, I bake from the book when I want and swing by to glimpse the real thing on a regular basis.

Chocolate Chip Coconut Oatmeal Cookies | The Naptime Chef

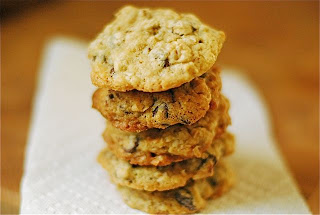
I’ve made at least two dozen recipes from the book so far and they have all been scrumptious. In fact, this cookie recipe is so totally awesome that I’ve made it almost a dozen times on it’s own. It has already made the transition from “good new recipe” to “old favorite” in my household which, trust me, is not an easy road. I am a bit of a cookie snob and many, many recipes have been cast by the wayside. What I love about this cookie is that it’s perfectly moist, much more so then many chocolate chip cookie recipes I bake, with a great balance of coconut and chocolate flavors. I also love how the added oatmeal creates a firm, chewy texture which I find appealing.

The other day I whipped these up during naptime after I’d set the chicken in to marinade for dinner. Baking them was easy and they were cooling by the time my daughter woke up. That evening we experimented with ice-cream and unanimously agreed that, in addition to being great on their own, they are perfect bookends for an ice-cream cookie sandwich. Over the course of the next three days we whipped through our tupperware container all too quickly and were sad to reach the bottom. I think this evening I’ll set out the butter to warm up for another batch.

Recipe

Chocolate Chip Coconut Oatmeal Cookies

adapted from SoNo Baking Company & Cafe Cookbook

Ingredients

2 c. all-purpose flour
1 t. baking soda
1 c. unsalted butter, room temperature
1 c. granulated sugar
½ c. light brown sugar, firmly packed
1 t. Kosher salt
2 large eggs
1 T. vanilla extract
12 oz. semisweet chocolate chips
1 c. sweetened shredded coconut
1 c. old-fashioned rolled oats (not quick-cooking)

Instructions

1. Preheat oven to 350ºF.  Line two baking sheets with silpat or parchment paper and set aside.
2. In a bowl, whisk together flour and baking soda, set aside.
3. In a mixer fitted with a paddle attachment, beat the butter, sugars and salt until light and fluffy. With the mixer on low, add the eggs one at a time until just blended. Add in vanilla and mix until it is no longer visible.
4. Scrape down the sides of the bowl, turn the mixer on low and slowly add in the flour until just incorporated. Using a spatula, fold in the coconut, chocolate chips and oats one at a time.
5. Use a 2″ ice-cream scoop to place the dough, 2 inches apart, on the baking sheets. Bake for 15-18 minutes, or until cookies are set and the edges are golden brown.

Naptime Notes

Naptime Recipe Serving ideas

I love to make these into ice-cream cookie sandwiches and roll the sides in sprinkles, this is a great cookie for that. If you want to change up the flavor try substituting craisins or dried currants for the chocolate chips.

Naptime Stopwatch

Making the batter takes 10 minutes. Baking time is about 30 minutes for the whole batch.

Naptime Reviews

We are a household of cookie lovers, you’d better believe we all gobbled these right down!

July 8, 2010

Mom’s Nearly Famous Gazpacho {Webisode #31}

What’s Going on Today: Hanging out in Cooperstown for the Fourth. Lots of fun in the sun, planning for an afternoon boat trip.
Naptime Goals: Lesson from Mom on how to make her awesome Gazpacho.
Tonight’s Menu: Gazpacho, Turkey Burgers, salad, ice-cream.
Parenting Lesson of the Day: Don’t tease toddlers about fish eating their toes, unless you don’t want them in the water.

You know I always love a good hand-me-down recipe, so you can imagine how excited I was last weekend when my Mom showed me how to make her nearly famous Gazpacho. I say nearly famous because it hasn’t been printed anywhere yet, but, now that it has, I’m sure it’s destined for glory. The oppressive heat and humidity in Cooperstown gave us the perfect opportunity for a naptime gazpacho making lesson. We were all too happy to stay in the air conditioned kitchen during the heat of the afternoon, and even more pleased that we didn’t have to turn on heat inducing appliances to make dinner.

As you’ll see above, Mom’s recipe is based on an old How to Make Gazpacho tutorial she ripped out of McCall’s long before I was born. It outlines the basics of gazpacho and gives the reader freedom to make changes as needed. My mother has been working on her “changes as needed” for roughly 34 years and has managed to buff and polish her version to a near perfect shine.

It turns out that one of her main secrets for this recipe is spicy V8. She swears that it contains the perfect amount of spice and is easier to measure than Tabasco. If someone wants more heat, she says, place a bottle of Tabasco on the table and they can help themselves. She also swears that a squeeze of lime in each bowl immediately prior to serving is key to uniting the flavors of garlic and tomato. This is a tip she learned from her friend Geri.

Gazpacho, like most soups, is best after it’s been able to rest for a bit in the fridge. This allows the flavors to blend and mature. Though I didn’t tape dinner, rest assured that we gobbled it down in the blink of an eye. You can imagine how grateful we all were to be enjoying cold soup on such a hot day and how particularly happy I was to be in possession of such a fabulous recipe.

Recipe

Mom’s Nearly Famous Gazpacho

Ingredients

3 medium plum tomatoes, seeded and roughly chopped
1 large cucumber, peeled
2 green onions, washed
1 red pepper
2 cloves garlic
11 oz. regular tomato juice
8 oz. Spicy V8 Tomato juice
2 T. olive oil
1/3 c. red wine vinegar
1 t. Kosher salt
1 t. pepper
2 limes

Instructions

1. In a food processor fitted with a blade attachment place 6 oz. of regular tomato juice, the red pepper, onions and garlic. Pulse 3-4 times. Add the cucumber and tomatoes. Pulse 3-4 times. Add the rest of the regular tomato juice, red wine vinegar, salt and pepper. Pulse 3-4 times. Finally, add in the spicy tomato juice and olive oil. Pulse 1-2 times.

2. Chill in the fridge until ready to serve. When serving, squeeze the juice of ½ lime over each bowl and stir in to each portion.

Naptime Notes

Naptime Recipe Serving ideas

There are plenty of great recipes for gazpacho. If you’d like to sweeten it up a bit add some fruit like cantaloupe or honeydew. If you think you need more heat, swirl in a few splashes of Tabasco to give it a boost.

Naptime Stopwatch

This recipe, from start to finish, takes about 15 minutes.

Naptime Reviews

My daughter doesn’t love cold soup yet – she thought this was salsa – but was game for dipping a few chips in it. My husband, well, you can see me swatting his hand away from the Cuisinart above!

July 6, 2010

Nibbles for a Casual Summer Cocktail Hour {Naptime Simple Tips}

What’s Going on Today: Fourth of July weekend fun! Friends over for cocktails, evening dinner al fresco.
Naptime Goals: Relax with a good book, whip up onion dip and help Mom with the tomatoes.
Tonight’s Cocktail Hour: Tomatoes stuffed with blue cheese or pesto, onion dip with vegetables, cheese plate, assorted nuts.
Parenting Lesson of the Day: Sometimes it’s ok to let toddlers eat crackers, carrots and yogurt for dinner.

Over the holiday weekend we were up in Cooperstown with my parents. On Saturday night we invited our neighbors to come over with their teenage grandchildren for a fun cocktail hour. With such beautiful weather and the garden in full bloom it was the perfect occasion to sit on the porch and catch up. The event was to be completely casual, we all planned on wearing jeans, and the food was to be easy and unfussy.

When my daughter was taking her afternoon nap my husband and I helped my parents get things ready. My husband was in charge of setting up the bar with assorted liquor and garnishes for drinks, while Mom and I tackled the food. Since simple cocktail food shouldn’t take long to prepare, we relied on a few old favorites that could be assembled in a snap.

For the two main appetizers we choose to make tomatoes stuffed with pesto or blue cheese with the fresh tomatoes we’d picked up at the farmer’s market. Then, I cooked up my favorite onion dip to serve with carrots and fresh cucumbers, also from the farmer’s market. To balance out the vegetables, we set out a delicious container of goat cheese with strawberry compote and a nice round of runny Camembert with some buttery crackers. Finally, to include a little salt on the table, we poured two bowls of fancy nuts. All in all it was a simple and delicious menu for a party of eight, plus one toddler. I should mention that she munched on so many vegetables and crackers that all she actually ate for dinner was a container of yogurt. With all of us in summer mode I didn’t mind one bit. It was the perfect start to a relaxing weekend.

Casual Summer Cocktail Hour:
Stuffed Tomatoes: Halve and seed cherry tomatoes. Fill with a scoop of fresh pesto or blue cheese. Serve.
Ina Garten’s Pan-Friend Onion Dip with Cucumbers and Carrots
Goat Cheese with Strawberries
Camembert, runny
Fancy Nut Assortment
Lillet with Lemon over ice
Prosecco
Sparkling water and Cokes (for the teens)

July 1, 2010

Burgers with Chive-Parsley Butter {Webisode #30}

What’s Going on Today: Daughter’s first day of camp! July Fourth decoration preparation underway…
Naptime Goals: Prepare Burgers for tonight’s grilling lesson.
Tonight’s Menu: Burgers with Chive Parsley Butter, Caesar Salad, Roasted Red Potatoes with Herbed Salt.
Parenting Lesson of the Day: Rain helps us start over with a clean slate.

I love burgers in the summer and am always up for trying new recipes. Of course, one of my favorites is still Uncle Will’s Burger recipe, which will always be an onion-topped classic. When I was flipping through June’s Bon Appetit the other day I read a great article about a technique utilizing Meyer lemon butter in a burger. I loved it’s promises of moister meat and added flavor. I couldn’t wait to give technique a try and set straight to work.

Of course, unlike my friend Liz, I do not have Meyer lemons growing in my backyard. However, I do have regular access to fresh herbs. So, instead of using lemon butter I decided to make Chive-Parsley butter to give the meat a fresh herbaceous flavor. My neighborhood gourmet shop has a great butcher who grinds grass-fed meat and forms hamburger patties. I bought four of those to start with and made the butter at home. Preparing the butter and burgers during naptime was a snap. Then I was able to leave them covered in the fridge until dinner time. As you’ll see, unfortunately, my grilling dreams were thwarted by the rain, but I still managed to cook them on my stovetop grill pan.

The butter technique worked beautifully. The burgers were tender, juicy and more flavorful thanks to the green herbs. I also toasted the buns on the stovetop and gave them an extra swipe of Chive-Parsley butter for greater depth of flavor. Paired with a salad and potatoes they made for a tasty summer meal. I guess there is also next week for my grilling outdoors!

Recipe

Hamburgers with Chive-Parsley Butter

Ingredients

4 6oz. hamburger patties
5 T. good quality unsalted butter
1 T. chives, finely chopped
1 T. parsley, finely chopped
4 Hamburger buns

Instructions

1. In a food processor or mini-chopper, add the butter, chives and parsley. Pulse until well combined and slightly softened.
2. Take each hamburger patty and make a well in the center. Form a ½″ ball of herb butter with your hands and press it into the well. Gently fold over the outer edges of the burger to cover the butter completely and seal it in. Repeat with remaining 3 patties. *At this point uncooked burgers will last, tightly wrapped, in the fridge for up to 6 hours.
3. Set your grill or grill pan at medium heat. Place the hamburger patties on top and cook, turning occasionally, to desired doneness. While the burgers are cooking, place the buns either on the grill or in the toaster. After they have toasted swipe them with a thin layer of remaining herb butter and set aside.
4. Plate burgers on toasted buns and serve hot.

Naptime Notes

Naptime Recipe Serving ideas

Go ahead and play with different herbs when making the butter. Strong flavors like basil or oregano would work well, too.

Naptime Stopwatch

Making the herb butter takes 10 minutes. Pressing it into the hamburger patties takes about 5 minutes. If you like to form your own hamburger patties add on an additional 5 minutes.

Naptime Reviews

We are a family of burger fans and the littlest one is forming her habit, too.

More Naptime Recipes